Many players have reported experiencing high ping and latency spikes while playing Valorant, which can significantly impact their gaming experience. In this guide, we will address some common questions related to Valorant’s high ping and latency spikes and provide you with effective solutions to overcome these issues.
So, if you’re facing problems with high ping and latency in Valorant, read on to find out how to resolve them and enjoy a smoother gaming experience.
Why is my ping always so high in Valorant?
Valorant high ping issue occurs due to multiple reasons.
According to Valorant players updating their network driver significantly reduce the high ping in Valorant.
So try to update your network/WIFI drivers which will help you to have stable internet and eliminate the Valorant high ping issue.
How to Decrease High Ping and Lag in Valorant?
If you’re experiencing high ping and lag in Valorant, there are several steps you can take to try and improve your connection and reduce latency. Here are some suggestions:
- Check your internet connection: Ensure that your internet connection is stable and functioning properly.
- Use a wired connection: Whenever possible, connect your computer directly to your router using an Ethernet cable. Wired connections generally provide more stable and faster connections compared to Wi-Fi.
- Close bandwidth-intensive applications: Close any other applications or programs that are consuming a significant amount of bandwidth on your network.
- Disable background downloads and updates: Make sure that no large downloads or updates are running in the background while playing Valorant. These processes can consume bandwidth and increase latency.
- Choose the right server: Valorant allows you to select which server region you want to play on. Choose the server that is geographically closest to your location to minimize latency.
- Upgrade your hardware: If you’re consistently experiencing high ping and lag, consider upgrading your hardware, such as your router or network adapter.
- Disable unnecessary software: Close any unnecessary background applications and processes on your computer. Some applications, especially those using a lot of system resources, can impact your network performance.
Solution 1: Restart the Valornat
Whenever you encounter Valorant High Ping and any game bug, you should restart the game before trying any further solutions.
Restarting the game will eliminate any temporary error which is occurring due to the old cookies and cache or the system’s other software clashing with your gaming software.
All of these errors will be eradicated after a simple restart of the PC or any other platform you use.
Solution 2: Close Unwanted Programs
If there are too many programs running in the background, using too much internet/RAM/Disk can cause Valorant High Ping & Latency Spike on Windows 11.
Closing unwanted programs will help you eliminate the crashing issue on your PC.
So, let’s close unwanted programs:
- Press Ctrl + Shift + ESC keys to open Task Manager
- Now check which program is using more Network
- Right-click on that program and select End task
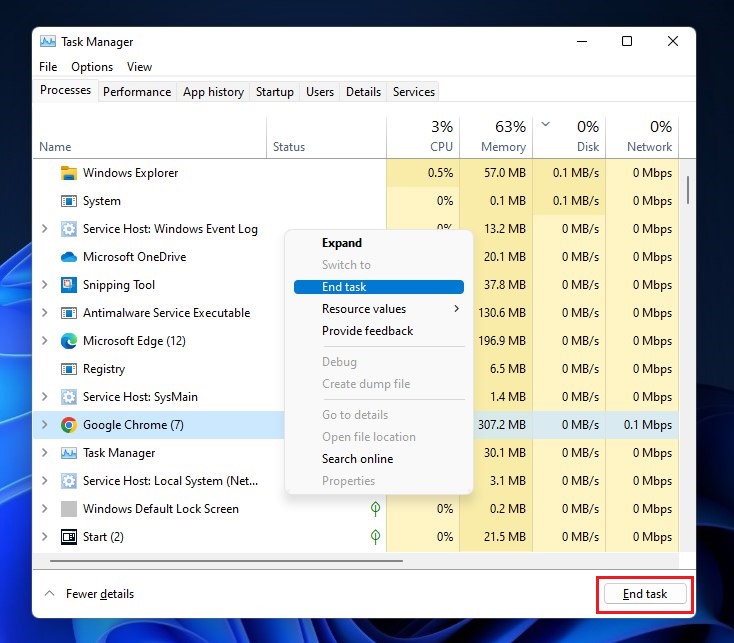
- And check if the crash is solved or not.
Solution 3: Switch to a More Reliable VPN
If you are using a VPN extension in your web browser then it’s an issue. You have to disable all VPNs and prefer the desktop version VPNs which are reliable to use. And these premium VPNs are available on all devices.
Free VPN did not allow you to stream at full speed they set a limit to the free version which is not a very useful speed for working or playing Valorant.
For your convince, I am listing down some most reliable plus they are working with other users without having any High Ping issues or network lag in Valorant.


Solution 4: Change Network Buffering Setting
Enabling network buffering can help minimize lag and delay during online gaming sessions. Users have the option to adjust buffering settings either within the game’s options menu or the network settings on their computer.
it’s important to note that increasing buffering settings may result in higher network latency and reduced network throughput. It is advised to experiment with the Minimum, Moderate, and Maximum settings to find the optimal configuration that suits your specific needs.
Solution 5: Power Cycle Your Router
If you’re still experiencing Valorant lagging issues on your PC after trying the previous solutions, power cycling your router could help you establish a better internet connection and potentially solve the problem. Here’s how to do it:
- Completely turn off your router by disconnecting the power cable from the power switch.
- Leave it turned off for 5 to 10 minutes before plugging it back in.
- Check if the Wi-Fi network is visible and properly connected to your devices.
It’s important to note that you should restart all devices affected by the power cycling process to ensure an accurate fix. By power cycling your router, you may be able to reset its internal memory and establish a fresh connection with your devices, which could potentially resolve any connectivity issues causing the game to crash.
Solution 6: Improve Your Wi-Fi Speed
If your PC is unable to connect to WiFi, one possible reason could be that the router is located too far away from your computer. To address this issue, you can try relocating the router closer to your PC. This will result in stronger signals and a more stable internet connection, potentially resolving network problems in Valorant.
Alternatively, if relocating the router is not feasible, you may consider purchasing a powerful router that can provide strong and wide-ranging signals throughout your house. This upgrade can help ensure a stable and reliable internet connection for gaming.
Another option to consider is using an Ethernet cable to connect your PC directly to the router. This eliminates potential WiFi interference and provides an uninterrupted internet connection, which can be particularly beneficial for online gaming, including Valorant.
By implementing these solutions, you can enhance your connectivity and minimize network-related like high ping, and packet loss issues while playing Valorant.
Solution 7: Update Network Drivers on Windows 11 Via Windows update
Updating your network drivers can greatly improve your internet experience, providing a more stable connection and helping to resolve packet loss issues in Valorant. By updating your network drivers, you can enjoy a smoother gameplay experience without any interruptions or disruptions.
Here is how you can update the wifi driver:
- Click on the Windows icon
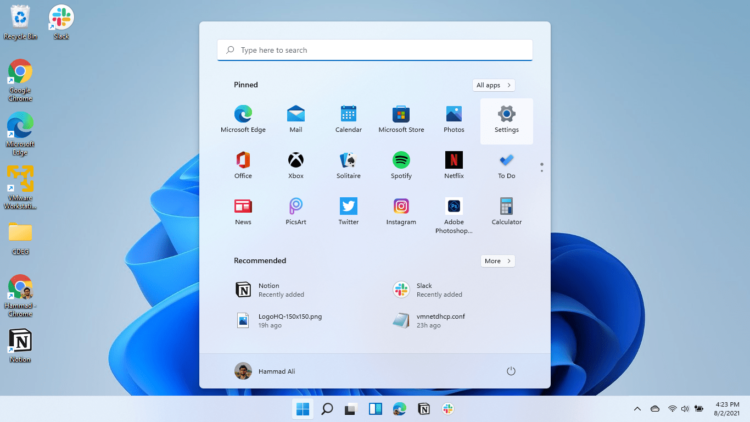
- Click on the settings icon
- A new window will pop up
- Select windows update from the left menu
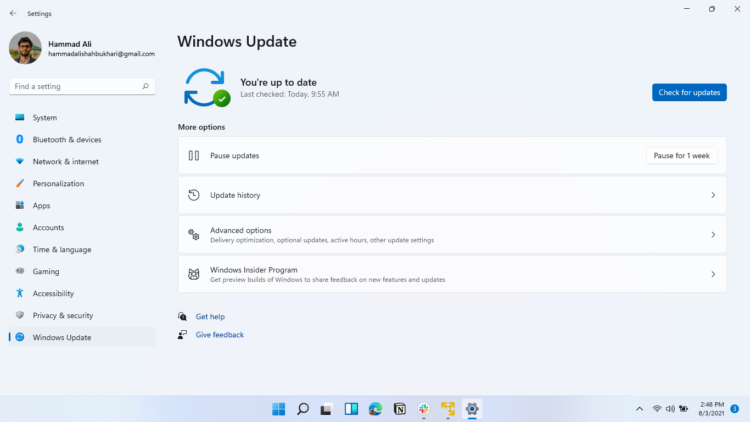
- The new window will pop up
- Now select Advanced options
- Click on Optional updates
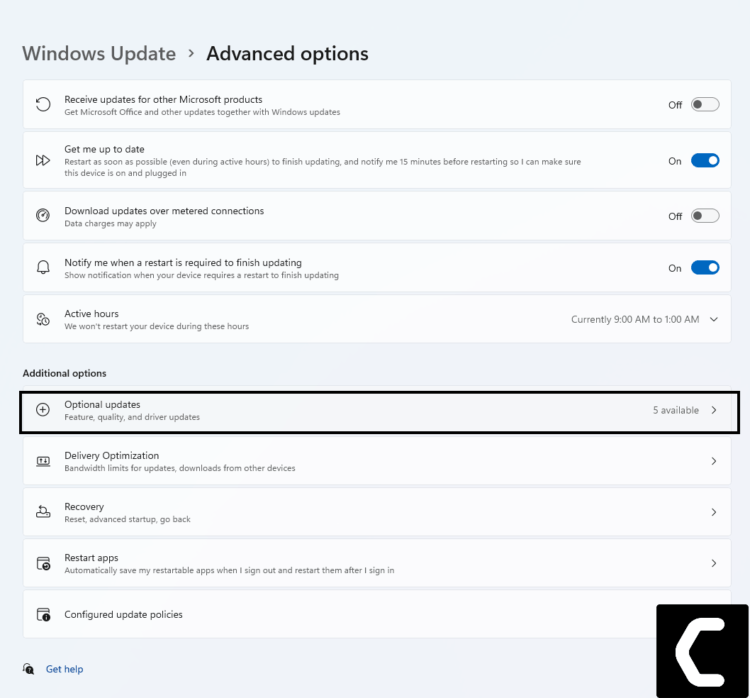
- A new window will open
- Click on the drop-down button of driver’s updates
- Now select your desire drivers and check in the box
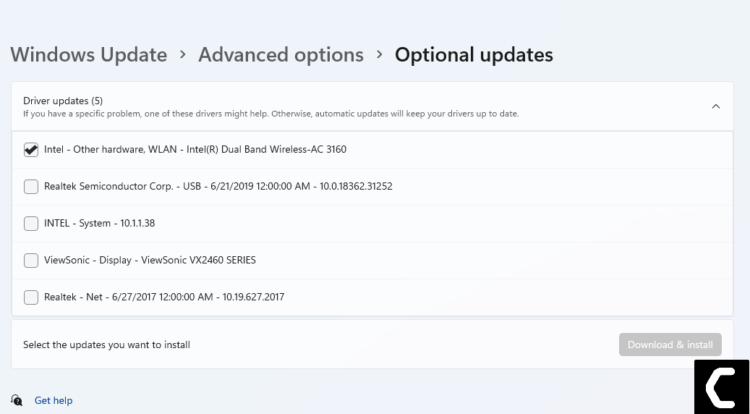
- Now press the Download & install button and
If you are unable to update your drivers through Windows Update, then you can try updating the WIFI Drivers through Device Manager.
READ ALSO: How To Fix No Sound Output Problem on Windows 11?
Solution 8: Update WIFI Drivers on Windows 11 through the Device manager
Outdated Network drivers can be updated in multiple ways. If you are unable to update your graphic drivers by updating Windows, you can try updating through the Device Manager too and this will help fix Valorant High Ping.
Here is how you can update WIFI drivers:
- Click on the Search icon
- Type device manager
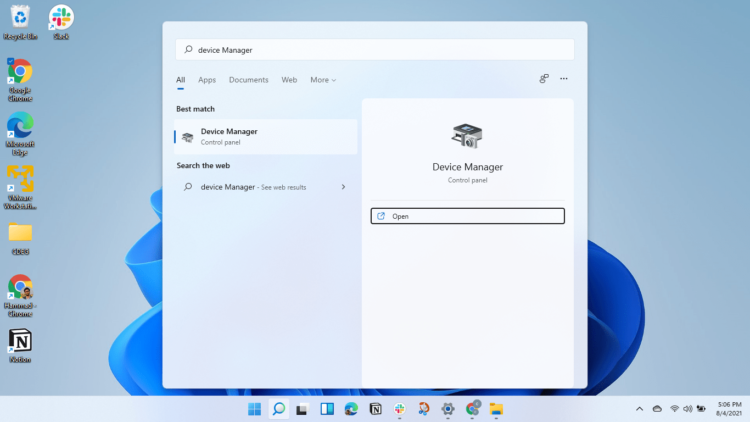
- Click to open Device Manager
- Then select the Network adapter
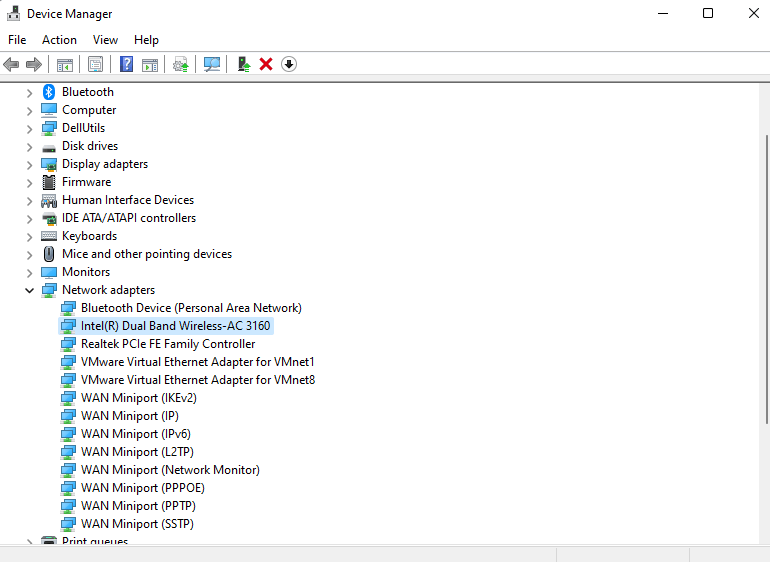
- A further menu will open
- Find your WIFI drivers
- Right-Click on the WIFI card name
- Click on the updated driver
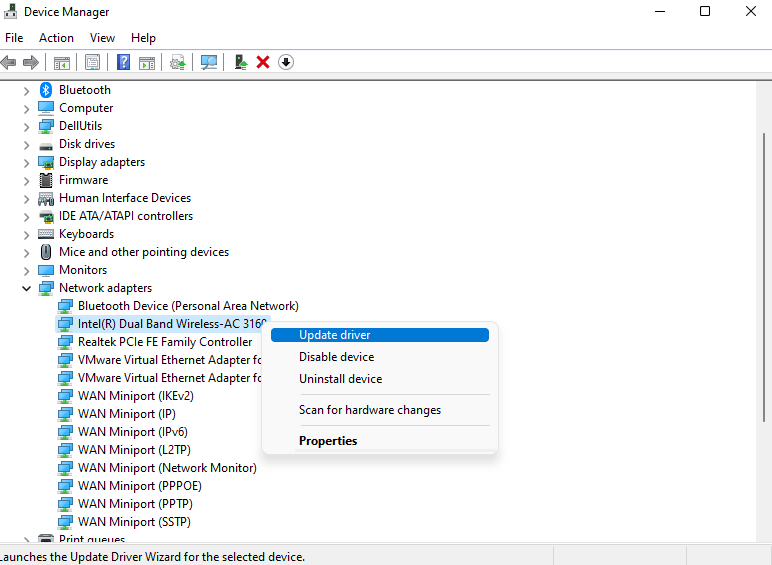
- Now a new window will open
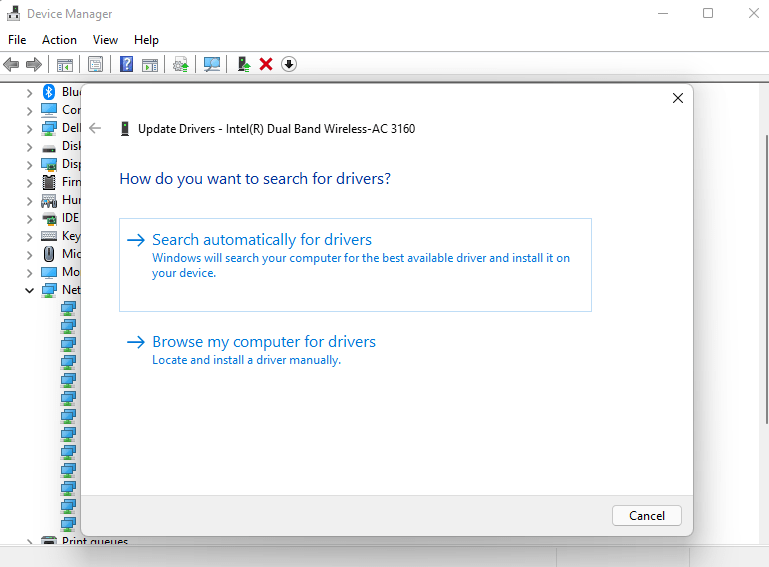
- Select “Search automatically for drivers“
- If you want to install some other driver on your WIFI then
- Select “Browse my computer for drivers“
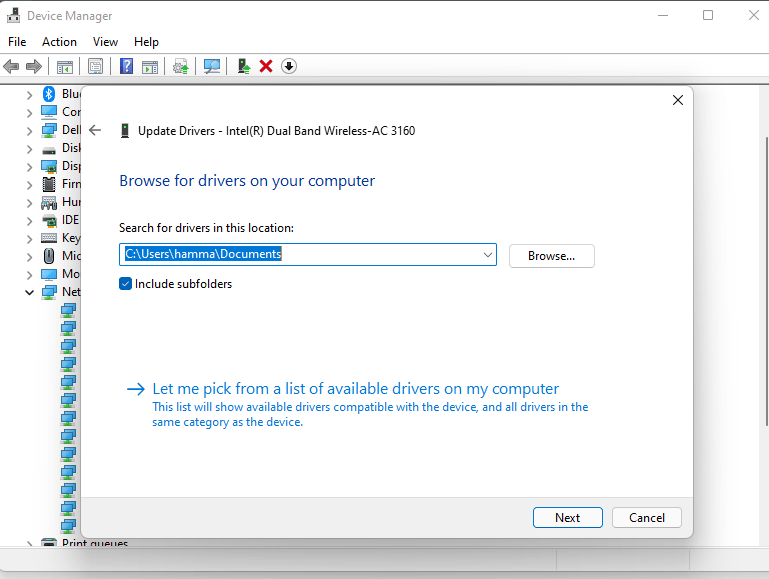
- And then go to the path where you download the new drivers.
- Restart your PC and check if the Valorant High Ping is fixed or not.
If updating the driver didn’t fix Valorant High Ping Spikes then move on to updating your PC.
Solution 9: Clear DNS Cache and Data
Clearing the DNS cache removes all the entries and forces your computer to repopulate those addresses the next time you try accessing those websites. This won’t affect performance and will fix Valorant’shigh ping.
How to stop lag in Valorant by clearing the DNS cache?
- Click on the Windows start icon on the bottom left corner.
- Then press the Windows key + R.
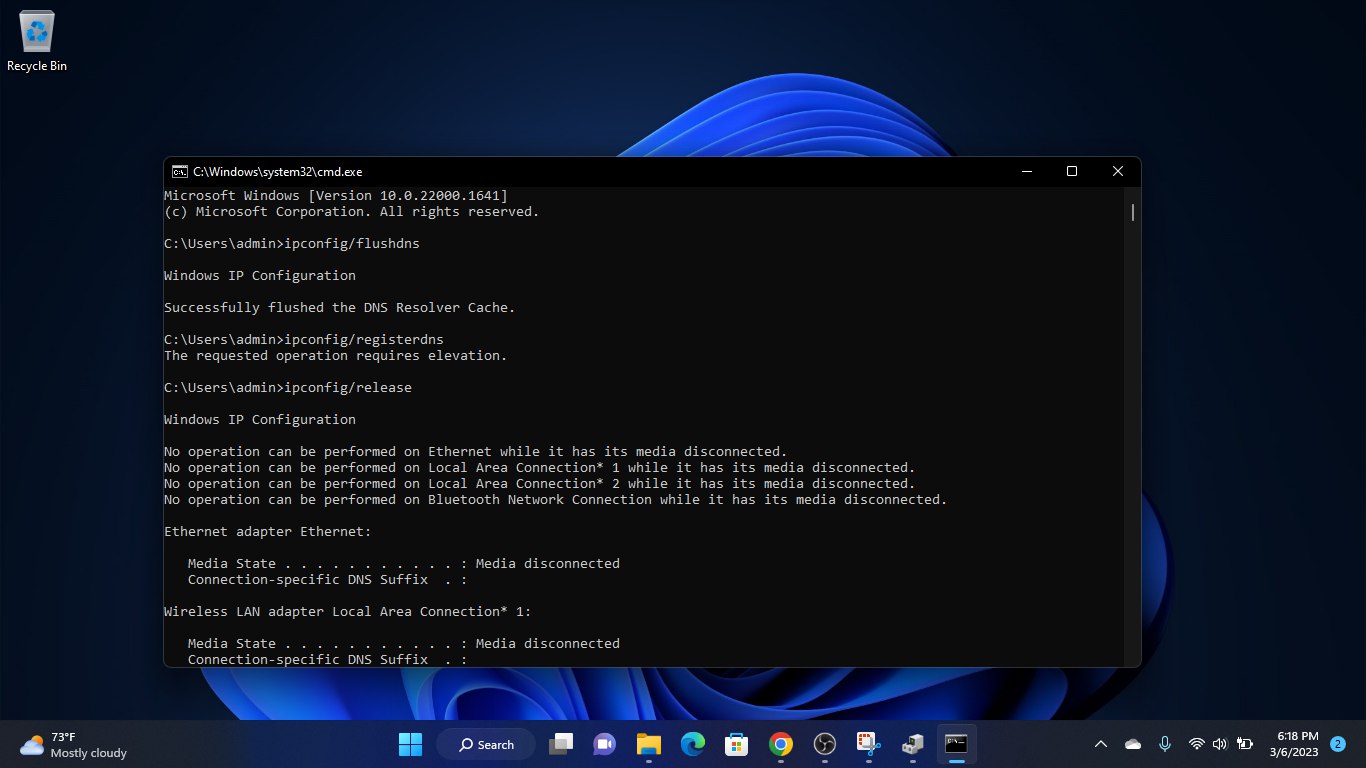
- The Run box will appear. Type cmd.exe, and click on OK.
- Then on the cmd window, enter the following commands: (Note: Type the following commands, and hit Enter after every command)
- “ipconfig/flushdns”
- “ipconfig/registerdns”
- “ipconfig/release”
- “ipconfig/renew”
- netsh winsock reset
- Now restart your PC and check if the Valorant packet loss is fixed
Solution 10: Changing IPv4 Configuration
If the computer is failing to obtain the DNS Server Addresses automatically, Valorant ping spikes might be triggered.
Therefore, in this step, we will be opening the Network Properties and entering the DNS Server Addresses manually.
How to lower ping on Valorant by changing IPv4 Configuration?
- Press “Windows” + “R” to open the Run prompt.
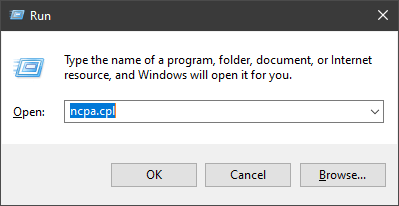
- Type in “ncpa.cpl” and press the Enter key. Open Networking Settings in Control Panel.
- Right-click on the network that you are using and
- Select “Properties” by Right-clicking on the current connection in use.

- Double-click on the “Internet Protocol Version 4(TCP/IPv4)” option.

- Double-clicking on the IPv4 option
- Check the “Obtain DNS Server Addresses Manually” option.
- Enter “8.8.8.8” In the primary address box and “8.8.4.4” in the secondary address box.

- Click on “OK” and check to see if the Valorant lagging persists.
Solution 11: Performing a Clean Boot to Initialize the Game Again
Clean boot will help you to eliminate the unnecessary applications which are running on the backend.
And shut down any applications which are conflicting with each other and causing Valorant High Ping.
Here is how to perform a Clean Boot:
- Press Windows Button + R Key
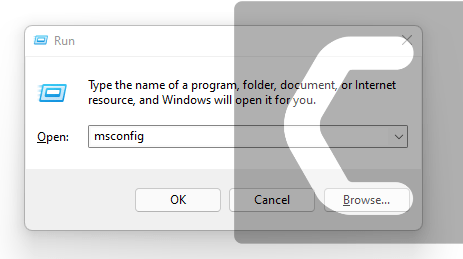
- The Run Dialogue Box will appear
- Type “MSConfig“
- Press Enter
- The System Configuration window will open
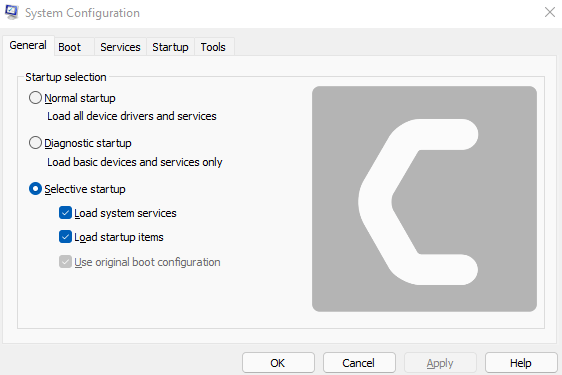
- Select Services tab
- Uncheck all the unnecessary service
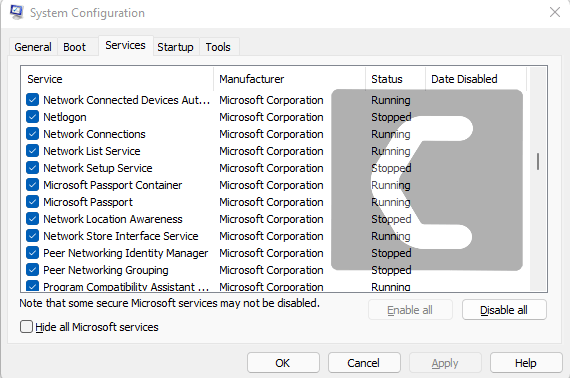
- Only check those you need now
- Now click OK
Now your clean boot is done and the unnecessary services are eliminated and enable you to play Valorant without having a ping spike.
If the error still persists then proceed to the next solution to solve Valorant High Ping.
Hope all of the above solutions help you to solve.
Share your experience in the comments section below.
FAQ
How do I fix Valorant high ping and packet loss?
Here are the solutions to fix high ping and packet loss:
1. Restart the Valorant
2. Restart the PC
3. Restart the router
4. Update the drivers
5. Update the Windows/OS
How do I fix lag in Valorant?
You can fix lag in Valorant by performing multiple solutions which are mentioned below.
1. Check the system requirements
2. Check your Internet speed
3. Switch to Wired connection
How do I optimize my router for Valorant?
Here is how you optimize your router for Valorant:
1. Check for broken cables
2. Change the cable connecter to “R45” from “R11”
3. Power cycle your router.